I’ve been running profitable Google Shopping ads for almost 10 years now. In fact, I got started with Shopping even before Google started charging for the service.
And you know what? Google Shopping ads have consistently outperformed all other advertising mediums that I’ve ever used for my online store.
As of right now, I’m getting a 6-7X return on ad spend on my top Google Shopping campaigns. And the best part is that unlike Facebook ads, Google Shopping ads are almost set it and forget it.
In other words, you don’t have to coddle your campaigns and worry about ad fatigue because your ads are essentially evergreen.
Anyway in the interests of completeness, this comprehensive post will cover the basics of Google Shopping all the way up to advanced tactics that the pros are currently using to optimize ads.
If you are already an intermediate Google Shopping Ads user, then feel free to use the table of contents below to skip around.
Get My Free Mini Course On How To Start A Successful Ecommerce Store
If you are interested in starting an ecommerce business, I put together a comprehensive package of resources that will help you launch your own online store from complete scratch. Be sure to grab it before you leave!
What Are Google Shopping Ads And Why Are They So Powerful?
If you’ve ever performed a search in Google, then chances are you’ve seen Google Shopping Ads in the wild without even realizing it.
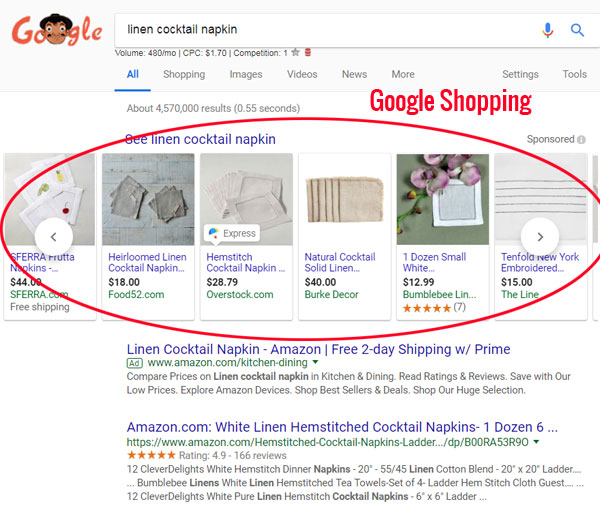
For example, when I type in the keywords “linen cocktail napkin” into Google, this is what shows up in the search results.
Now the reason why Google Shopping ads are so effective is because of 3 factors.
- Search Intent – When someone types in a product based keyword in Google, there is a much higher probability that the visitor is looking to buy.
- Product Photography – Because a picture of your product is shown to the visitor, he or she knows exactly what the product looks like before they click on the link.
- Price Clearly Marked – Because the price is clearly shown, the visitor already knows how much your product costs before they click on the ad.
Whenever customers click on your ad, they already have most of the information they need to make a buying decision.
As a result, there is clear purchase intent which is why Google Shopping converts so well. And the best part is that you only pay Google when someone actually clicks on your ad.
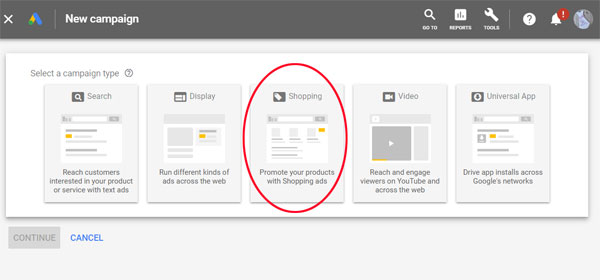
Step 1: Getting Started
One of the negative aspects of Google Shopping is that it requires a little bit of setup before you can run your first ad.
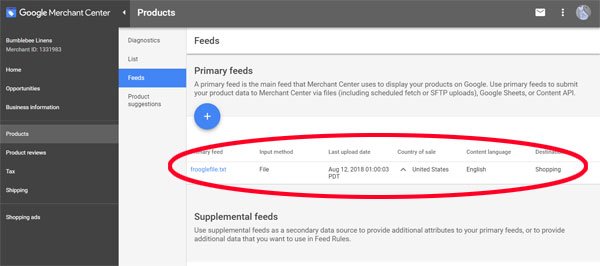
In addition to signing up for a Google Adwords account, you also need to setup your product feed over at the Google Merchant Center.
A product feed is information that Google uses to display your products for Shopping ads. In other words, a feed is where you submit your product data to the Google Merchant Center.
A feed can be generated in 3 ways
- Tab Delimited CSV File – A simple excel file that lists your products for sale
- Google Sheets – Same as the above except with Google Sheets
- Content API – Your shopping cart will transmit your products electronically to Google
If you are on Shopify or BigCommerce, the Google feed can be automatically created and is already built into the platform. But in general, any modern shopping cart will have a Google Shopping feed plugin that you can use.
Step 2: Make Sure Your Feed Is Optimized
One thing that you’ll notice about Google Shopping ads is that you can’t directly bid on specific keywords for your products.
In fact, this is the one major difference between Google Shopping Ads and regular Google Adwords ads.
As a result, you have to rely on Google to “magically” determine which search terms apply to which products. And the main information that Google uses to decide comes from your product feed.
Now most people simply submit their product feed to Google without looking at it, but it’s in your best interests to spend a few minutes on optimization.
After all if your feed is poor, then no ads will be shown to visitors because Google has no idea who to show your products to.
Here are some guidelines for a good strong feed
- Use Strong Titles – Make sure you do the proper keyword research on your products. Use a tool like Long Tail Pro to find keywords that visitors are using to search for your products. Don’t forget to include your brand and try not to exceed the 150 char limit.
- Use Strong Descriptions – Make sure that you incorporate any secondary keywords into your product description.
- Use Structured Markup – Structured markup is a way to help Google crawl your site properly. In other words, instead of having Google parse your site and make educated guesses, you can simply spell out to Google the relevant information about your products directly on your website.
- Choose An Accurate Google Product Category – Google provides a list of valid categories that you must specify for your products. If you don’t select a valid category, then your ads may not show.
- Leverage The Product Type Field – Use the product_type attribute to include your own product categorization system in your product data. Unlike the Google Product Category attribute, you get to select the values. Make sure you include all relevant keywords here including competitors.
Step 3: Run Your First Google Shopping Ad
Once you have your feed setup, you are ready to run your first ad!
But before you get too excited, there are a few things that you need to know about how Google Shopping Ads work.
First off, Google ads is a learning platform which means that you will initially need to bid a slightly higher amount to provide Google with the conversion data that it needs.
In other words, it’s in your best interests to set your CPCs at the upper range to get more traffic in the beginning.
Here’s a quick and dirty way to set your starting bids.
Take your avg profit per purchase and multiply it by your average conversion rate.
For example, let’s say you make $50 profit per purchase and your average conversion rate is 2%. Then you should set your starting bid at $1.
Usually in the beginning, you must be prepared to lose some money in order to calibrate Google’s algorithm.
For my store, my keywords and products are relatively inexpensive so I usually set my initial cost per click bid at $1 and let it ride for all products.
Once your campaigns are up and running, allow them to run at least a week.
Note: Your initial bid highly depends on your products and can be higher or lower depending on the level of competition. If you don’t see any impressions or traffic in the first 48 hours, then chances are you are bidding too low.
Step 4: Adjust Your Bids Accordingly
Once you have some impressions, clicks and hopefully some sales, it’s time to start analyzing your data.
Now optimizing your Google Shopping campaigns is both an art form and a science. And while it’s ok to follow general guidelines, often times you’ll need to make some decisions based on your instincts.
For example, some people will say that you shouldn’t make any changes until you have 100 clicks. Others will make immediate adjustments once they have as few as 10 clicks.
Ultimately, it’s up to your gut feel whether you have enough data to take action.
Because we are the leader in the handkerchief space, I feel pretty confident making changes with as few as 20 clicks for certain products.
In any case, I’ll outline a set of guidelines below but feel free to adjust them as you see fit.
First off, you need to use the Adwords campaign manager to filter out your products that are doing well.
In my case, I like to choose products that are getting at least a 4X return on ad spend with at least 2 conversions or more.
For these winning products, I’ll usually up the bid to increase the number of impressions to these products.
Similarly, I’ll reduce the bids on products that are receiving a low ROAS (<2.5X) or products with “sufficient” clicks but no conversions.
Step 5: Add Negative Keywords
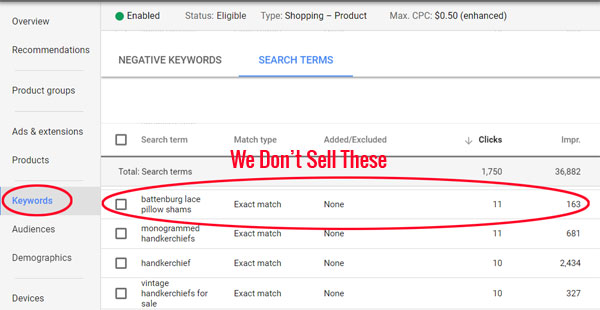
Once you are getting some impressions and clicks, you also need to look at your Google Shopping campaigns to see if there are any search keywords that are totally irrelevant to your products.
To find your negative keywords, simply click on the keywords tab and select “search terms”.
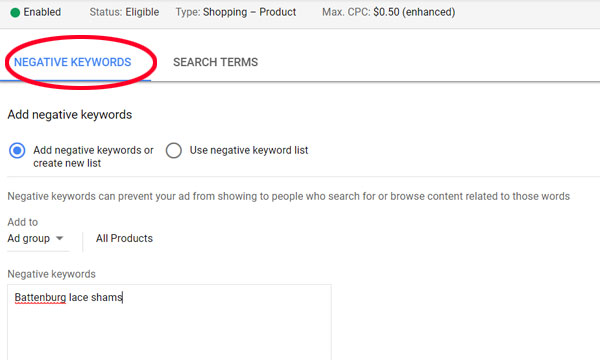
Then look for keywords that you know for sure will not result in a sale. For example, we don’t sell battenburg lace shams in our shop but Google is showing ads for this keyword term.
As a result, I’ve added this keyword to my negatives list.
In the very beginning, you should monitor your negatives like a hawk but as your campaigns mature, you can probably get away with looking at your search terms once per month.
Step 6: Bid Higher On Your High Converting Search Terms
Remember when I said that you can’t bid on specific keywords for your Google Shopping campaigns? Well that statement is only partially true.
With a little bit of trickery, you can indirectly bid higher on your highest converting keywords.
Similar to the way you found your negative search terms, you also want to perform the same exercise on your highest performing keywords as well.
Under the search terms page, use a filter to find keywords that are getting a ROAS of > 4X with more than 2 conversions.
Once you have your best performing keywords, follow these directions.
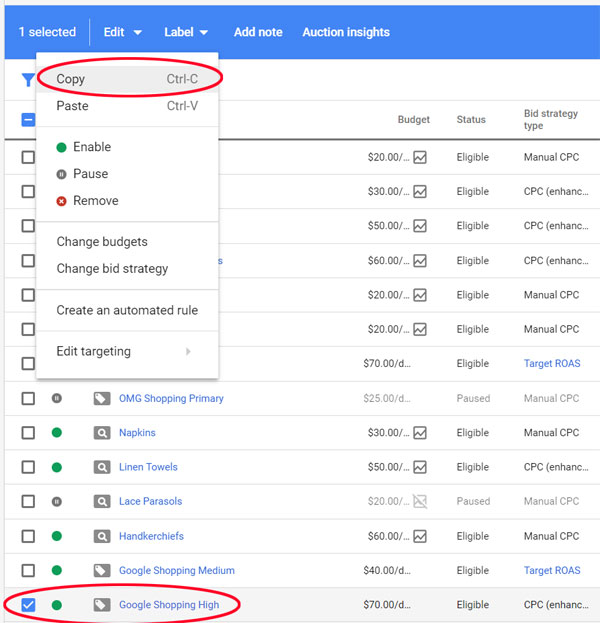
First, you need to make an exact duplicate of your main Google Shopping campaign.
This is accomplished by selecting your campaign and doing a copy and paste.
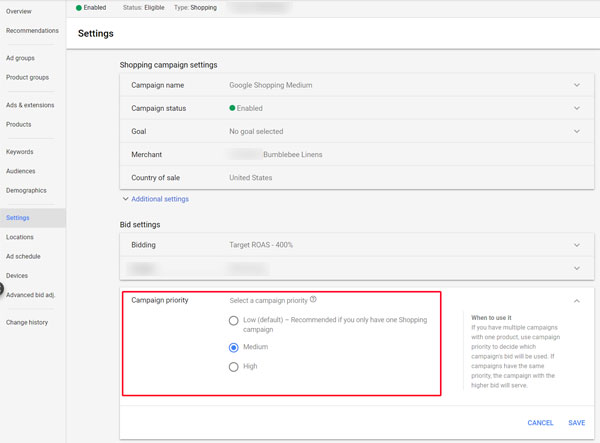
Once you have created a duplicate campaign, you need to go under settings and change the priority of the duplicate campaign to “medium”
What did we just do?
Basically, we created an identical shopping campaign to our main campaign with a lower priority. As a result, any search query that doesn’t fall under our main campaign will trickle down to our medium priority campaign.
Once both campaigns are setup, you need to go under your main high priority Shopping campaign and add your best keywords to the negative keyword list.
You heard that correctly.
You do not want your best keywords to fall under your main Shopping campaign. Instead you want those keywords to trickle down and be served by your newly created “medium priority” campaign.
Finally, you want to adjust the bids higher in your duplicate medium priority campaign. This way, you can bid higher on your highest converting keywords in Google Shopping!
In case you are a little lost, here’s a quick summary of the process.
- We created an identical clone to our existing Google Shopping campaign with a medium priority
- We then made our best keywords negative on our main campaign so those keywords trickle down to our medium campaign.
- We set our bids higher on our medium campaign so that our best keywords get the most exposure on Google
Step 7: Further Optimize Your Ads With RLSA
If you’ve followed steps 1-6 above, you are already more knowledgeable than 90% of advertisers out there!
These next set of optimizations were ones that I learned from my good friend Brett Curry from OMG Commerce.
In fact, Brett took over my entire Google Shopping account last year to show me the power of some of these advanced concepts.
The first thing that Brett did was apply RLSA to my Google Shopping ads.
RLSA stands for remarketing lists for search ads which is a feature that allows you to tailor your search campaigns based on whether a user has previously visited your store.
Now this step doesn’t have to be overly complicated but the general idea is that you want to bid higher for folks who have already visited your site.
Why? It’s because people who have already visited your site are much more likely to convert.
In the example above, I am increasing my bid 250% for all people who have visited my site. As a result, I’m pretty much guaranteed to get the top search result for existing customers.
Even though I’m bidding so high, I still get a 6X return on ad spend because the conversion rate is so good for warm traffic.
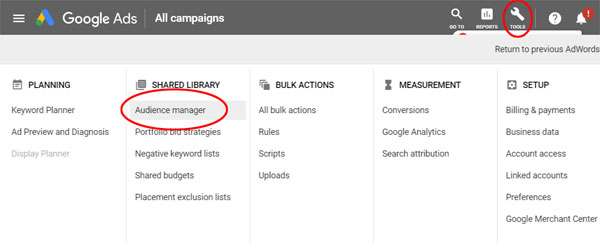
To create an audience for RLSA, simply go under the “Tools” menu and select “Audience Manager”
In the audience manager, you can create custom audiences based on
- Website Visitors – Create audiences based on specific pages that a customer has visited
- Customer List – Upload a list of visitor emails to create a custom audience
- Similar Audiences – Create what is essentially the equivalent of a lookalike audience in Facebook. Google will find people that are similar to your existing customers.
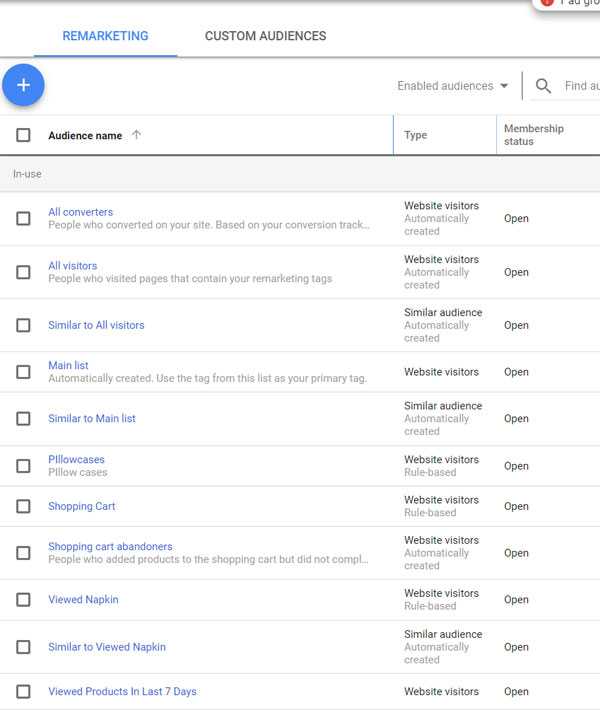
Here’s an excerpt from my list of custom audiences.
Just as an example, I have an audience called “Viewed Napkin”. And for everyone who’s viewed a napkin product in our store, we’ve boosted the bids on all of our napkin products.
Adjusting your bids using RLSA is a very powerful way to improve conversions.
Step 8: Use Location Based Targeting
If your products are selling well in specific geographical locations, then it’s in your best interests to increase your bids in your high converting areas and reduce your bids in your poorly converting regions.
For example if I sell Washington Capitals jerseys, I wouldn’t want to show ads for these products to people living in California.
Even if your products have broad appeal, it’s worth looking at the location based breakdown of your sales and adjust your bids accordingly.
In the example above, I’ve increased my bid for residents in Colorado by 25% because people in Colorado are more likely to convert based on my prior sales data.
Conversely, people in Adams County, Pennsylvania don’t convert as well so I’ve reduced the bid by 25%.
Location based bidding is a great way to fine tune your ads!
Step 9: Schedule Your Ads Appropriately
The bulk of ecommerce sales occur during regular business hours. And if you look at the transaction data for your shop, you’ll notice that most people rarely buy anything after 10PM.
As a result, it’s in your best interests to only show your ads during peak sales periods during the day.
In the example above, I don’t make many sales on Friday from midnight to 2AM so I’ve reduced the bids by 30% during that period.
Conversely I get a large number of orders on Mondays between 4AM -1PM so I’ve upped those bids by 20%.
Take a look at when your conversion rate is the highest during the day and adjust your bids accordingly for maximum profit!
Step 10: Adjust Your Bid Based On Device Type
For most ecommerce stores, customers like to browse on their smartphones but make their purchases from the comforts of a desktop or tablet.
For my store, my mobile conversion rate is lower than my desktop conversion rate so I bid slightly less for mobile visitors on Google.
Now this strategy may or may not be a wise move because customers often require multiple touchpoints before buying from your store.
But in our case, almost all of our customers purchase on the same day as discovering our products. As a result, we lower our mobile bids to increase our ROAS.
Step 11: Create A Top Products Campaign
Once your campaigns have been running for a while, you should start to see certain products convert better than others with a high ROAS.
The next step is to move these high converting products SKU by SKU to their own separate campaign and increase your bids on these products.
Now you’re probably asking yourself, why bother grouping together your top products instead up just upping your bids in your main campaign?
Grouping all of your top products allows Google to further optimize your campaigns and increase the visibility of your ads to a wider audience.
Remember, Google uses a learning algorithm and the better your campaigns convert and the higher your quality score, the more often Google will show your ads at lower bids.
In addition, grouping your top products together allows you to perform the next optimization which is incredibly powerful.
Step 12: Use Google’s Target ROAS Feature To Put Your Campaigns On Autopilot
Once Google has enough conversion data from your campaigns, you can literally put your top performing ad campaigns on autopilot.
This feature is called “Target ROAS” and it allows Google to take over all of your bids on your campaign to achieve your desired return on ad spend.
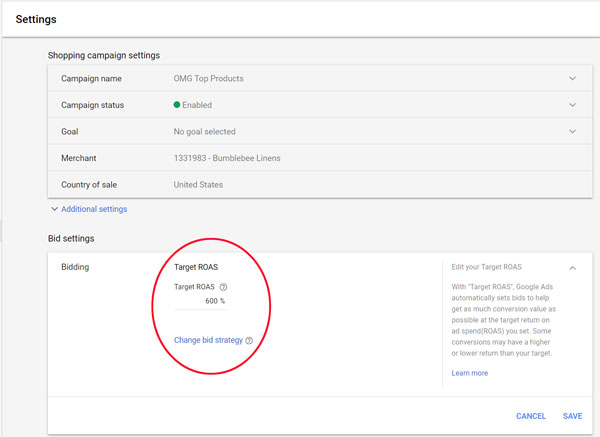
To turn on Target ROAS bidding, go to your settings page, choose Target ROAS and select your desired return on ad spend.
Now there are a few things about Target ROAS that you should be aware of.
First off, you shouldn’t turn Target ROAS on unless you can consistently achieve at least 15 conversions in a 30 day period. After all, you need some traction in your campaign before you start.
In addition, because Target ROAS is a campaign wide feature, you should enable this feature on your best, most consistent campaigns. This is one of the reasons why we created a “top products” campaign back in step 11.
Finally, you should not set your Target ROAS too high, otherwise Google will not be able to achieve it and just give up.
If your campaign follows all of the criteria above, Google actually does a pretty good job of achieving your target return. And the best part is that it’s set it and forget it.
Here’s a snapshot of one of my Target ROAS campaigns.
As you can see, Google has done a pretty good job of maintaining my return on ad spend without lifting a finger.
On one campaign, I requested a 6X ROAS and Google got me a 7X ROAS. On the other campaign, I requested a 7X ROAS and I got a 6.39X ROAS.
Not bad!
Step 13: Create A Low Bid Campaign For Brand Terms
This final campaign can actually be created and run from the start. And the idea behind this campaign is to create a very low bid set of Shopping ads to cover any low hanging fruit.
For example, if anyone types in your brand name, this low bid campaign should display your product ads at a very low cost.
By bidding 3-5 cents per click, you are ensuring that your products are showing up over your competitors for your own branded terms.
In general, this campaign will not be a high volume campaign, but it’s usually highly profitable. And you’ll probably make a few sales here and there for extremely long tail keyword terms as well.
Conclusion
As you can tell from the 13 steps above, running Google Shopping ads profitably is more than just launching a generic campaign and watching the money pour in.
You have to be proactive, monitor your data and take appropriate action.
Almost everyone who has complained to me that “Google Shopping ads don’t work” usually have not done the proper due diligence with their campaigns.
If you want to learn more about how to start a profitable online store, then consider signing up for my free 6 day mini course.
Click Here To Take The Free Class
Note: I don’t do consulting nor do I run Google Shopping campaigns for other people. However, my friend Brett Curry offers a Google Shopping campaign management service.
I trust Brett and if you need help running your campaigns, he can be found at OMGCommerce.com
Ready To Get Serious About Starting An Online Business?
If you are really considering starting your own online business, then you have to check out my free mini course on How To Create A Niche Online Store In 5 Easy Steps.
In this 6 day mini course, I reveal the steps that my wife and I took to earn 100 thousand dollars in the span of just a year. Best of all, it's free and you'll receive weekly ecommerce tips and strategies!
Related Posts In Google Advertising Strategies
- Adwords Express – Are Google Smart Campaigns A Waste Of Money?
- Google Shopping Ads Explained In One Simple Step By Step Guide
- Best Comparison Shopping Sites – Google Shopping Vs Nextag Vs Bing Vs Shopping.com
- Google Search Ads Tutorial – How To Buy Cheap Targeted Traffic With Storeya
- Bing Search Ads – How I Made An Extra $3253 Last Month With A Few Clicks Of The Mouse

Steve Chou is a highly recognized influencer in the ecommerce space and has taught thousands of students how to effectively sell physical products online over at ProfitableOnlineStore.com.
His blog, MyWifeQuitHerJob.com, has been featured in Forbes, Inc, The New York Times, Entrepreneur and MSNBC.
He's also a contributing author for BigCommerce, Klaviyo, ManyChat, Printful, Privy, CXL, Ecommerce Fuel, GlockApps, Privy, Social Media Examiner, Web Designer Depot, Sumo and other leading business publications.
In addition, he runs a popular ecommerce podcast, My Wife Quit Her Job, which is a top 25 marketing show on all of Apple Podcasts.
To stay up to date with all of the latest ecommerce trends, Steve runs a 7 figure ecommerce store, BumblebeeLinens.com, with his wife and puts on an annual ecommerce conference called The Sellers Summit.
Steve carries both a bachelors and a masters degree in electrical engineering from Stanford University. Despite majoring in electrical engineering, he spent a good portion of his graduate education studying entrepreneurship and the mechanics of running small businesses.










Great stuff Steve. We are not actively pursuing this. Thx
Sorry I meant to say We are NOW actively pursuing this.
If one’s Shopify store has a wide variety of products, what initial methods can one use to first find the highest market demand products to be used in the Google shopping Ads? My Shopify store currently has casual clothing, sandals & beachwear, and ‘home-ware’ like blankets, pillows, essential oils, etc.
Just manually run all the keywords through LTP and look for the most hits? Or is there a faster way like linking LTP or another program to one’s store for a product scan?
Thanks