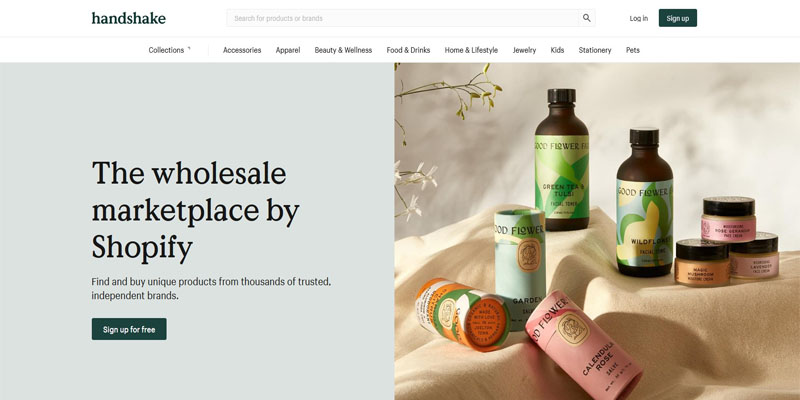
If you’re looking for a wholesale marketplace like Faire, Tundra, or Bulletin that doesn’t charge any listing and selling fees, then Shopify Handshake is the perfect platform for you.
Handshake is a relatively new online marketplace by Shopify where you can sell wholesale products for free.
In this post, you’ll learn everything you need to know about Shopify Handshake, including what it is, how it works, how to sell on the Handshake marketplace, and its pros and cons.
Get My Free Mini Course On How To Start A Successful Ecommerce Store
If you are interested in starting an ecommerce business, I put together a comprehensive package of resources that will help you launch your own online store from complete scratch. Be sure to grab it before you leave!
What Is Shopify Handshake?
Shopify Handshake is an online B2B marketplace where brands can sell their products wholesale to retailers at no cost. All wholesale suppliers on the Handshake platform are based in the US and handpicked by Shopify.
Originally, Handshake was an independent company that provided inventory management software for retailers. But Shopify acquired Handshake in 2019 and relaunched it as Shopify Handshake in late 2020.
Selling on Shopify Handshake is simple. You list products for free and ship them out when retailers purchase them.
There are no listing or selling fees to sell products on Shopify Handshake. However, your business must be registered in the US.
Although Shopify Handshake is currently only available in the US, Shopify plans to expand it to other countries in the future.
Why Use Shopify Handshake?
As a brand owner, Shopify Handshake provides you with a simple, easy and free way to sell wholesale to retailers and boutiques.
Shopify’s main goal with Handshake is to help you add another sales channel to grow your business. Unlike other wholesale marketplaces, Shopify Handshake allows you to communicate directly with buyers without any restrictions. In a way, Shopify Handshake is like the Alibaba of US wholesale.
As a buyer, Shopify Handshake gives you the opportunity to build relationships with US-based wholesalers. You also receive goods much faster than buying wholesale from China.
Shopify Handshake is still relatively new so if you sign up now, you’ll have an early mover advantage and establish yourself well before your competitors.
Overall, Shopify Handshake is an excellent platform for wholesalers who want to grow with the platform and for retailers who want to buy from US-based suppliers.
Click Here To Sign Up For Shopify For Free
Is Shopify Handshake Free?
Shopify Handshake is 100% free to use and there are no listing or transaction fees on sales.
You can list wholesale products for free and keep 100% of your sales as Handshake doesn’t charge a commission fee.
When compared to other B2B marketplaces like Alibaba and Faire, Shopify Handshake is exceptionally cheap. You just need to be eligible for a Shopify Handshake account.
Click Here To Sign Up For Shopify For Free
How Does Shopify Handshake Work?
Here’s how Shopify Handshake works:
- You launch a Shopify store and make at least one sale.
- You apply for a Shopify Handshake account to sell wholesale products.
- You set up your Handshake profile from your existing Shopify admin panel.
- You set a minimum order requirement and price.
- A retailer buys your products.
- You ship the product.
- You receive the payment immediately without any deductions.
How To Sell On Shopify Handshake
To sell on Shopify Handshake, you need an active Shopify store with sales.
Here’s a step-by-step tutorial on how to sell on Shopify Handshake:
Step 1: Apply For A Shopify Handshake Account
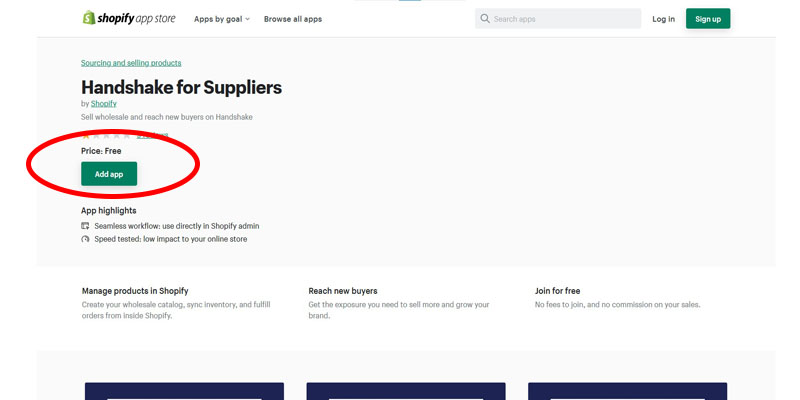
You need to install the Handshake sales channel in the Shopify admin to apply for a Shopify Handshake account. Follow these steps to install it properly:
- Click “Add app” on the Handshake for Suppliers page.
- Click “Add sales channel.”
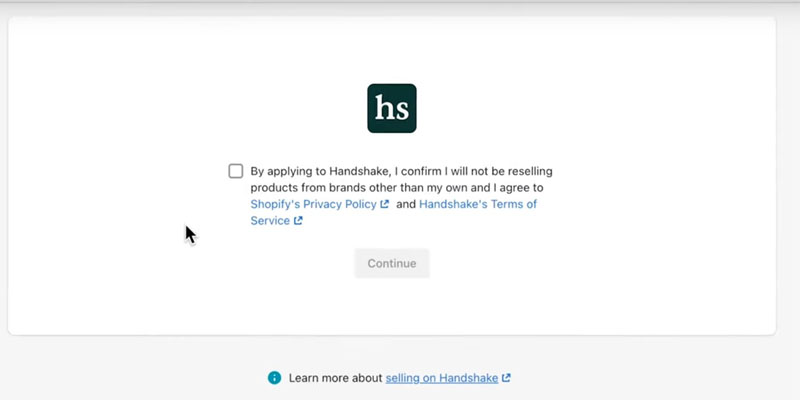
- Tick the Handshake’s Terms and Service checkbox and click Continue.
The Shopify Handshake team will then review your store and email you their decision within 10 to 14 business days.
Note: If you don’t receive an email within 14 business days, first check the Spam folder of your mail account and then contact the Handshake team at help@handshake.com.
Step 2: Add Brand Imagery And Details
Once your business is approved to sell on the Shopify Handshake marketplace, it’s time to set up your supplier profile.
Go to “Settings” > “Apps and sales channels” in the Shopify admin. Then click “Handshake” > “Open sales channel” > “Profile.”
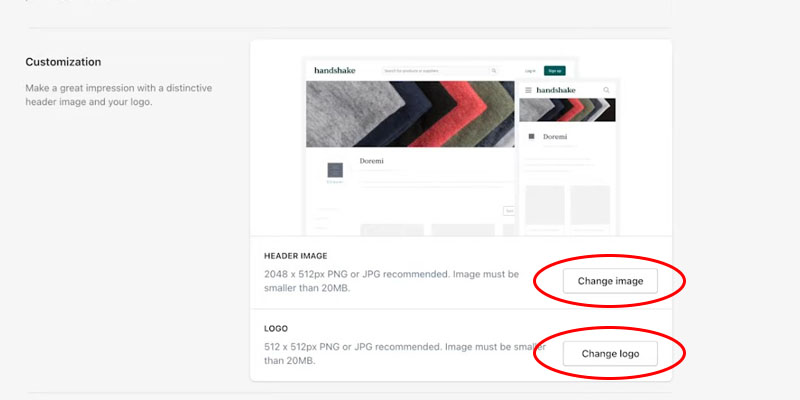
Add a header image by scrolling to the “Customization” section and click “Upload image.” Make sure the dimensions of the header are 2048 x 512 px, and the file type is JPEG or PNG.
Click “Upload logo” in the same section to upload your brand logo. Choose a 512 x 512 px file less than 20 Mb in size.
If the images are larger than the dimensions mentioned above, they will be automatically cropped from the center, and you won’t be able to adjust their positioning.
Once you’ve uploaded the images to Handshake, click “Save” to save the header and logo.
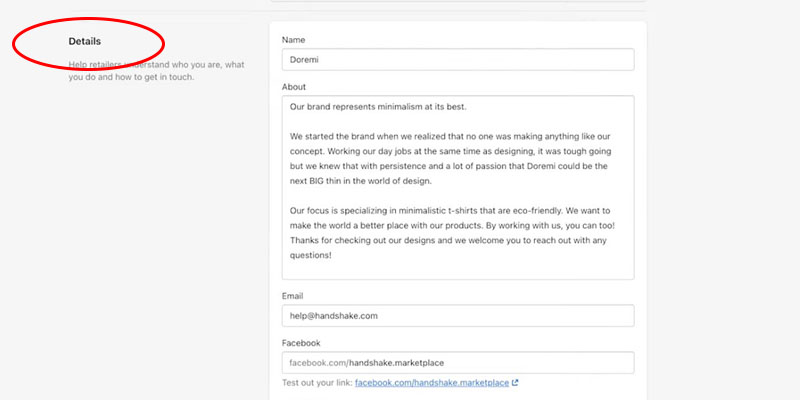
You can also add other details, such as your brand’s vision and story, in the description. To do that, scroll to the “Details” section, and enter your email address, brand name, and description.
Handshake also allows you to add links to Facebook and Instagram accounts so retailers can follow your social media channels.
Step 3: Set Up Shipping Rates
If you have an active Shopify retail store, it’s best to set separate shipping rates for the orders you’ll receive on Handshake.
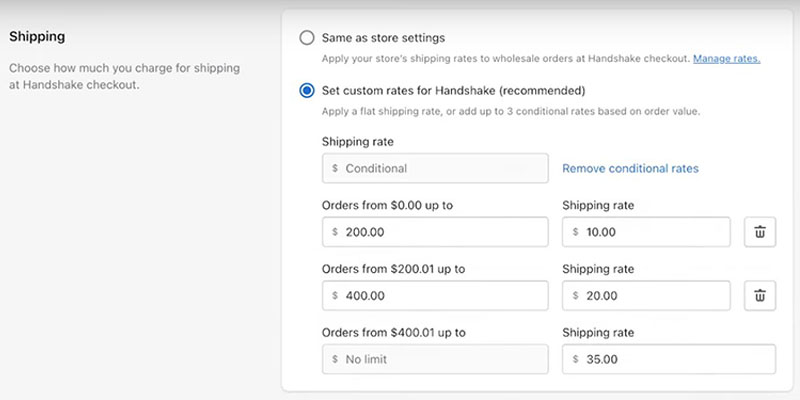
You can set up either a flat shipping rate or have up to 3 conditional shipping rates based on the order value.
Follow these steps to set up a flat shipping rate:
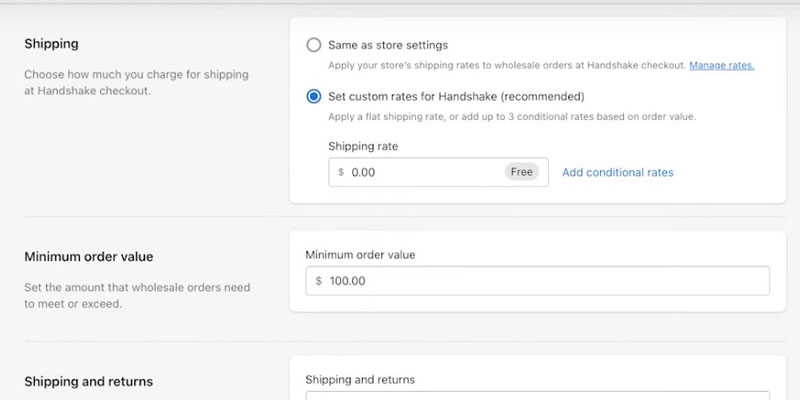
- Navigate to the “Preferences” page inside Settings > Apps and sales channels > Apps and sales channels > Handshake > Open sales channel.
- Scroll to the “Shipping section” and select “Set custom rates for Handshake (recommended).”
- In the “Shipping rate” field, enter a value you wish to charge for shipping on all orders. Insert the value of 0 to offer free shipping.
Click “Save.”
Follow these steps to set up conditional shipping rates:
- Navigate to the “Preferences” page inside Settings > Apps and sales channels > Apps and sales channels > Handshake > Open sales channel.
- Select “Set custom rates for Handshake (recommended)” in the “Shipping” section.
- Click “Add conditional rates.”
- Enter up to 3 conditions based on the order value and their shipping rates.
For example, If you want to charge $15 shipping fees for orders below $250, add $0 USD – $250.00 USD in the Order value range and $15 in the Shipping rate field. - Click “Save.”
Step 4: Set A Minimum Order Value
Minimum order value (MOV) is the lowest order amount retailers must purchase to place an order on your store.
Retailers can see the MOV on your Shopify Handshake supplier page and every product page.
Follow these steps to set up a minimum order value:
- Open the “Preferences” page and go to the “Minimum order value” section.
- Add a minimum order value. For example, if you only want to accept orders above $500, add 500 in the text area.
- Click “Save.”
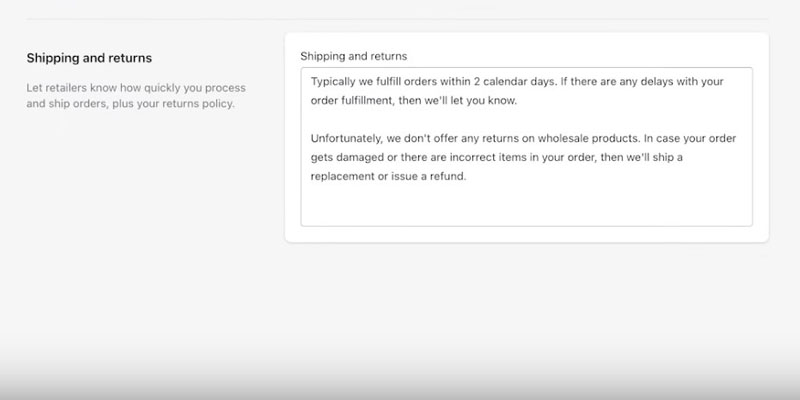
Step 5: Add Shipping Terms And Conditions
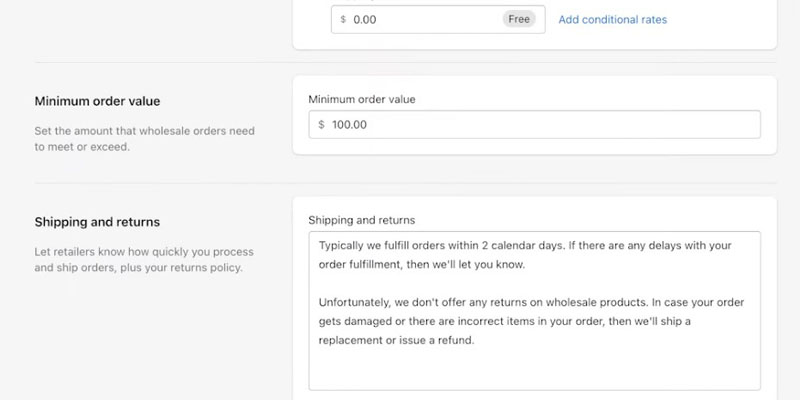
As a supplier, you need to add terms and conditions such as returns and refunds policy, shipping fees, and order processing time. These rules and guidelines act as legally binding contracts between you and your customers.
You can check these details on your Handshake supplier profile and all product pages.
Follow these steps to add shipping and returns information:
- Navigate to the “Shipping and returns” section on the “Preference” page.
- Add details about your returns, refunds, and other policies.
- Click “Save.”
Step 6: Add Products And Wholesale Pricing
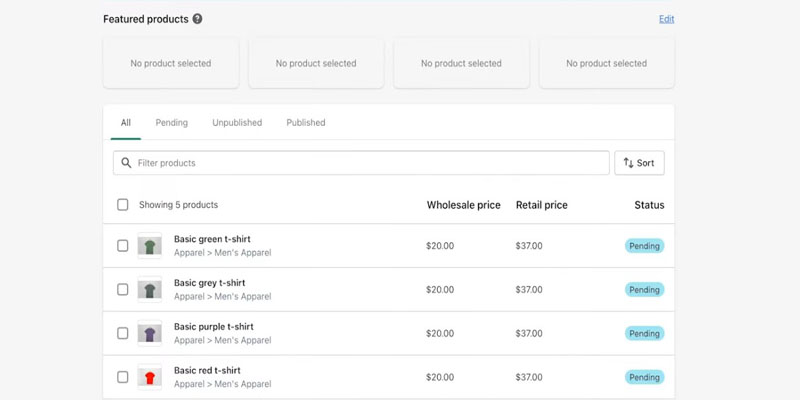
Shopify lets you manage products in your retail store and Handshake from the same admin panel.
If you add a product in Shopify admin, it automatically shows up in your Handshake sales channel. Go to “Products” in your Handshake sales channel to see an overview of all available products.
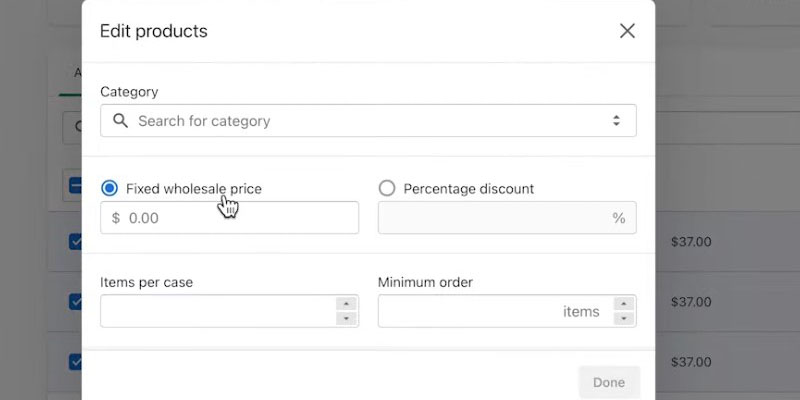
You can edit products in bulk by selecting their respective checkboxes and clicking on “Edit.” You can manage pricing, discounts, and minimum order values here.
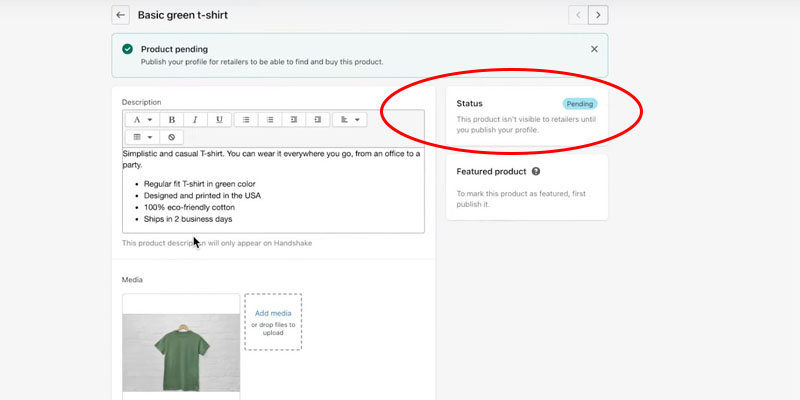
You can also edit each product individually. Select the product you want to update and customize its product details such as title, description, and images from your retail page.
To add a fixed price, select “Fixed wholesale price” and enter the price. You can also add discounts here by selecting “Percentage discount.”
To manage product availability, go to the “Status” section. Select either “Published,” “Scheduled,” or “Unpublished.”
Click “Save” to update your changes.
Note: If you want to remove a product from Handshake, go to “Products” in the Shopify admin and open the product. Click the “Manage” hyperlink in the “Sales Channels and Apps” section on the right side and uncheck the Handshake checkbox.
Step 7: Publish Your Handshake Supplier Profile
Before you publish your Shopify Handshake supplier profile, click “View profile” in the “Status” section of the “Profile” page to see a preview of your profile.
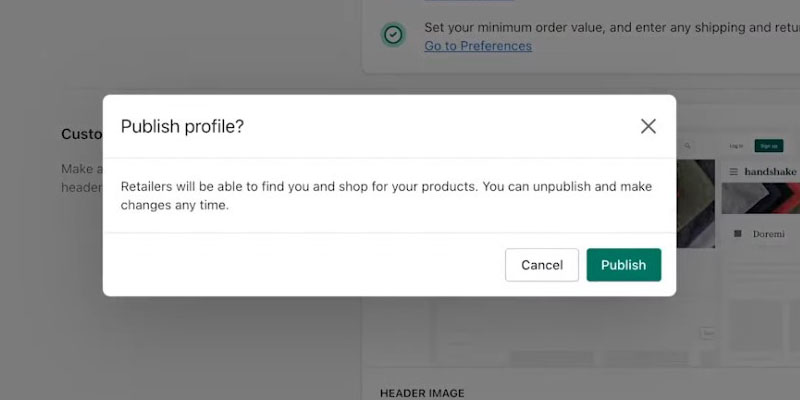
Next, select “Publish profile” and then click “Publish” to make your profile public.
Shopify Handshake Rules And Requirements
The Shopify Handshake rules are as follows:
- Your business must be from the United States.
- Your store must use USD currency.
- You need to have a payment provider enabled on your Shopify store. You can see the list of available payment providers here.
- You must have an active Shopify store with at least one sale. However, the more sales you have, the higher your chances of being approved to sell on Handshake will be.
- Your Shopify store must have at least $1,000 in sales.
- You must only list products from your own brand. Resellers aren’t allowed to sell on Shopify Handshake.
- The products must comply with Handshake Product Guidelines and Terms of Services.
- Product images must adhere to the Handshake Product Guidelines.
- Products must belong to the categories listed on the Handshake marketplace.
What Are The Shopify Handshake Categories?
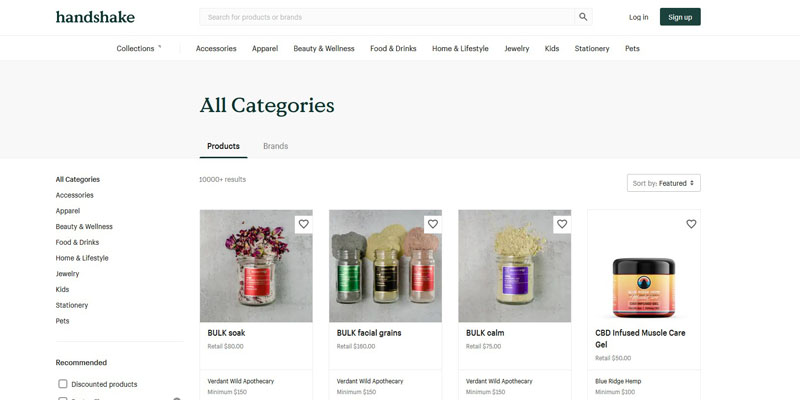
The Shopify Handshake categories are:
- Accessories
- Apparel
- Beauty & Wellness
- Food & Drinks
- Home & Lifestyle
- Jewelry
- Kids
- Stationery
- Pets
Tips For Selling On Shopify Handshake
Add An Ordering Widget Or Button
To promote your wholesale business to your customers, add an ordering widget or button on your Shopify online store.
Retail customers looking to place a bulk order or those planning on starting a business can click on the ordering button that will direct them to your Handshake supplier profile.
You can add either an ordering widget or an ordering button. A widget is a dynamic component you can add to your store without editing any code. On the other hand, you’ll need to edit your store’s code manually to insert the ordering button.
Join Shopify’s Facebook Page
The Shopify team emails sellers for any Handshake updates. But sometimes, they might post certain news or updates on their social media platforms that aren’t included in their emails.
So it’s best to join Shopify’s Facebook page for Handshake sellers and check it regularly.
Pros Of Using Shopify Handshake
- Easy and free to set up: All you’ll need to do is add the Handshake for Suppliers app and agree to their terms and conditions. The Shopify team will then review your retail store and let you know if you’re eligible for the Handshake marketplace.
- Verified wholesalers: Shopify has a stringent approval process and accepts only a handful of retailers to sell on Handshake. As a result, your store will get more exposure if you are accepted.
- No commission fees: Unlike other online marketplaces, Shopify Handshake doesn’t charge a commission fee on sales. However, this rule might change in the future as the marketplace grows.
- Integration with the existing Shopify setup: You can manage your retail and wholesale stores in one place, making it convenient to manage your online operations from a single dashboard.
- Attractive UI: Shopify Handshake has a minimalistic user interface that makes it easy for customers to purchase.
- Direct communications with buyers: You can communicate with retailers freely on and outside Shopify. This is because Handshake doesn’t benefit from keeping the buyer-seller relationship restricted to their platform, as Shopify’s business model doesn’t depend on fees and commissions.
- Upfront payment from retailers: Since Shopify doesn’t set any payment terms, you receive payment as soon as the customer purchases your products.
Cons Of Using Shopify Handshake
- No reasons provided for rejected applicants: Retailers have repeatedly complained about Shopify rejecting their applications without providing any justification. Many retailers have reported not receiving a response even after a month.
- Low sales: Wholesalers have complained of low sales as the platform is pretty new. Overall sales volumes seem lower than most other marketplaces.
- No payment terms for retailers: Customers need to pay in full upfront as Shopify Handshake doesn’t allow buyers to set net 30 terms online. This can discourage retailers from buying on the Handshake marketplace.
Shopify Handshake Next Steps
Once you’ve set up your Handshake store, you should also create a dedicated wholesale page on your Shopify retail store. You can add a “Shop Wholesale” button on the page that will direct customers to your Handshake marketplace profile.
Make sure you share your product listings on social media to improve visibility and build your brand. An easy way to do this is using Shopify’s Handshake-branded social media templates.
Handshake isn’t a dominant player in the wholesale space yet. Therefore, you must diversify your wholesale portfolio by listing your products on other B2B marketplaces like Faire and Abound instead of relying solely on Handshake.
However, Shopify is committed to Handshake and it should continue to grow in the coming years.
Click Here To Sign Up For Shopify For Free
Ready To Get Serious About Starting An Online Business?
If you are really considering starting your own online business, then you have to check out my free mini course on How To Create A Niche Online Store In 5 Easy Steps.
In this 6 day mini course, I reveal the steps that my wife and I took to earn 100 thousand dollars in the span of just a year. Best of all, it's free and you'll receive weekly ecommerce tips and strategies!
Related Posts In Ecommerce Marketing Strategies
- A Guide To Shopify Handshake And How To Get Started
- Should I Use Groupon? Don’t Be Tempted By The Dark Side
- How To Sell On Pinterest For Ecommerce Stores – The Ultimate Guide
- 8 Tips On How To Drive Traffic To Your Online Store
- The Right Way To Use Groupon And Living Social For Your Business

Steve Chou is a highly recognized influencer in the ecommerce space and has taught thousands of students how to effectively sell physical products online over at ProfitableOnlineStore.com.
His blog, MyWifeQuitHerJob.com, has been featured in Forbes, Inc, The New York Times, Entrepreneur and MSNBC.
He's also a contributing author for BigCommerce, Klaviyo, ManyChat, Printful, Privy, CXL, Ecommerce Fuel, GlockApps, Privy, Social Media Examiner, Web Designer Depot, Sumo and other leading business publications.
In addition, he runs a popular ecommerce podcast, My Wife Quit Her Job, which is a top 25 marketing show on all of Apple Podcasts.
To stay up to date with all of the latest ecommerce trends, Steve runs a 7 figure ecommerce store, BumblebeeLinens.com, with his wife and puts on an annual ecommerce conference called The Sellers Summit.
Steve carries both a bachelors and a masters degree in electrical engineering from Stanford University. Despite majoring in electrical engineering, he spent a good portion of his graduate education studying entrepreneurship and the mechanics of running small businesses.


