If you’re an Amazon FBA seller, you need to create a shipping plan.
In this Amazon shipping guide, I’ll walk you through everything you need to know to create an Amazon FBA shipping plan, from handling multiple products to choosing between SPD or LTL shipping methods.
By following the steps I’ve outlined below, you’ll learn how to efficiently manage your inventory and maximize your sales on the world’s largest online marketplace.
Are you interested in creating a strong, defensible brand for your products? If so, I put together a comprehensive package of resources that will help you launch your own online store from complete scratch. Be sure to grab it before you leave!
Table of Contents
How To Create A New Amazon FBA Shipping Plan
Creating a new Amazon FBA shipping plan consists of 7 steps.
- Select your inventory to be shipped
- Enter your pickup location
- Enter your destination
- Add your packing type and quantity
- Print SKU labels
- Confirm shipping details
- Print shipping labels
Here are step-by-step instructions to create a new Amazon shipping plan.
Step 1: Select The Inventory To Be Shipped

Start by logging in to your Amazon Seller Central account, head to “Inventory,” and click “Manage Inventory” from the dropdown.
Select the checkboxes of the products you want to ship to Amazon on the left and click the “Action on ‘X’ selected” button above the dashboard. Then select “Send/Replenish inventory” from the dropdown menu.
If you’re shipping a single product, click “Edit” on the right-hand side of the product and select “Send/Replenish inventory” from the dropdown menu.
Note: If you don’t see the “Send/Replenish inventory” option, you’ve probably chosen the “Fulfillment by Merchant” fulfillment method. You can switch to FBA by selecting “Change to Fulfillment by Amazon” from the same dropdown.
Step 2: Input Your Pickup Location
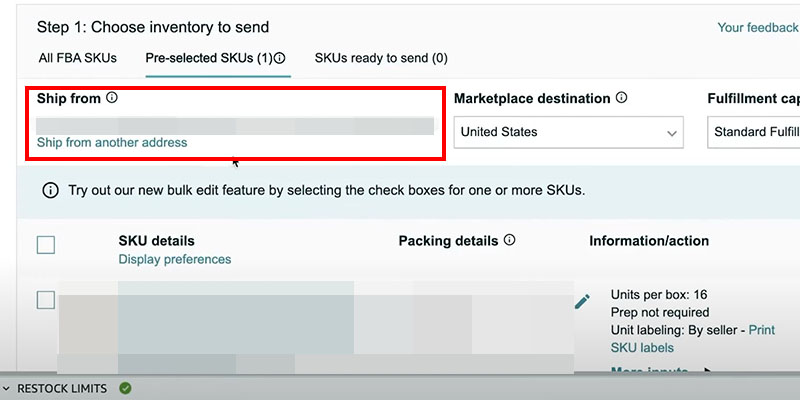
Once you’ve selected your products to ship to Amazon, you’ll be directed to a page to create your shipping plan.
Here, you’ll see the items selected previously under the “Pre-selected SKUs” tab. If you missed adding an item to the list initially, head over to the “All FBA SKUs” tab and select the product to include it in your list.
Enter a “Ship from” address on the left side of your screen. The “Ship from” address serves two purposes:
- To determine the return address for undeliverable items.
- To identify the appropriate fulfillment centers where you are shipping your items.
Amazon isn’t concerned about which address you enter. You can use your freight forwarder’s address, home address, or even a made-up address.
Many sellers importing goods from China use a California address, so Amazon assigns an FBA warehouse close to the port. While this is against Amazon’s guidelines, many sellers use this method to save on shipping costs.
Step 3: Input Marketplace Destination And Fulfillment Capability
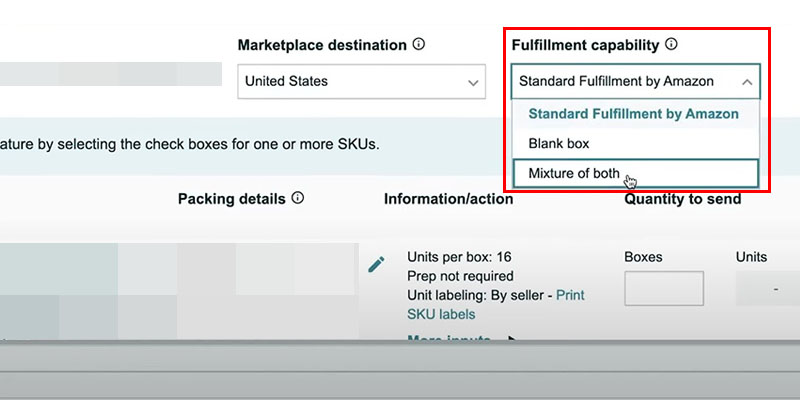
Input a marketplace destination for shipping your goods. For many, the destination will be the United States.
You’ll see a “Fulfillment capability” dropdown if you’re using Amazon’s multi-channel fulfillment service. This service allows Amazon to handle storage, packaging, and shipping for products you sell through various channels, such as your website and other marketplaces, like eBay.
You can select one of three options:
- Standard Fulfillment by Amazon: Choose this option if you wish to create a shipment plan for selling goods to Amazon customers.
- Blank: Select this option if you’re selling your products to channels other than Amazon.
- Mix of both: Select this option if you want Amazon to ship the products to customers from Amazon and other sales channels.
Step 4: Add Packing Type And Quantity To Send
If this is your first time shipping to an Amazon fulfillment center, create a packing template by selecting “Create new case pack template” from the “Packing details” dropdown.
Before you add packing details, you need to decide which packing type to use.
There are two types:
- Individual products: Each box contains different SKUs mixed together. For example, if you’re selling 1000 units of mixed SKUs, you can have one box with 50 units, the other with 100 units, and so on.
- Case-packed products: All boxes contain identical SKUs in the same condition and in equal quantities. For example, if you sell 1000 units in 10 boxes, each box must have 100 units.
Use the individual product packing type when shipping multiple items of different kinds or conditions in the same carton.
Alternatively, use the case-packed products option when shipping more than one carton, each filled with a single product type.
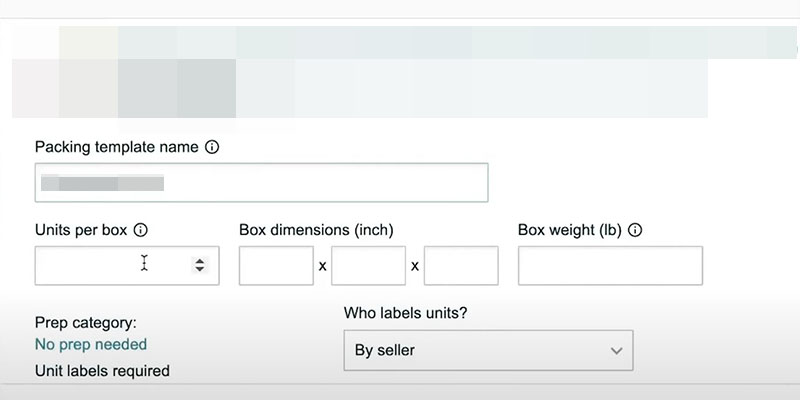
Then, input the following details in the “Packing details” pop-up:
- Packing template name: Add a simple template name. For example, you can add “Individual products” if you’re using the individual products packing type.
- Units per box: A unit is what a customer receives. For example, if you’re selling a book and a pen in a bundle, that’s still one unit.
- Box dimensions: Add box dimensions in inches. The size shouldn’t be more than 25 inches per side.
- Box weight: Add weight in pounds. Amazon restricts box weight to 50 pounds.
- Prep category: It’s preset to “No prep needed.” You can click the hyperlink and check from the dropdown if your products need extra packaging prep. For example, sharp and fragile items require extra foam and cushioning to avoid damage during shipment.
- Who labels units?: If you or your supplier are labeling, you can select “By seller.” If you want Amazon to add product labels, choose “By Amazon.” Note that Amazon charges a $0.55 per unit fee.
Click “Save” to save the template.
Finally, enter the number of boxes you’re sending to Amazon warehouses in the “Boxes” field. Click “Ready to send” below the “Quantity to send” column
Step 5: Print SKU Labels
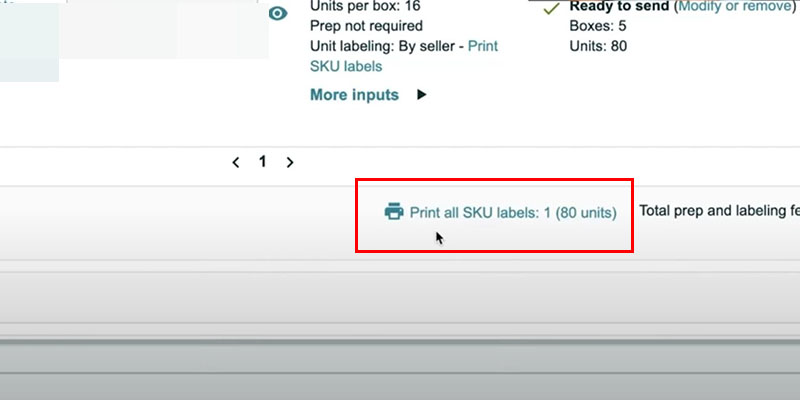
This step involves printing FNSKU labels for each of your products, which helps Amazon track and identify them.
To print the labels, click on the “Print all SKU labels” hyperlink located at the bottom of the “Step 1” board. From there, you can choose the printing format and label size before clicking “Print” to download the labels.
Click “Confirm and continue” at the bottom of the dashboard to proceed.
These Amazon FNSKUs must be applied to every single product box before shipment!
Step 6: Confirm Shipping
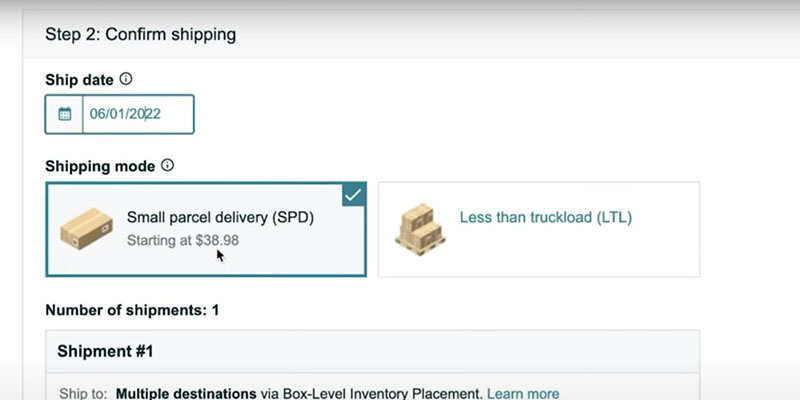
Confirm shipping by selecting your shipping date, mode, and carrier.
First, add a “Ship date” for the pickup of goods. Then, select your “Shipping mode.”
There are two different options in shipping mode:
- Small parcel delivery (SPD): Products are packed in individual boxes. Most new Amazon sellers will go with this option.
- Less than truckload (LTL): Cases or cartons are stacked or palletized. Seasoned sellers use this option for sending pallets to Amazon FBA warehouses.
Next, select a shipping carrier. Amazon offers two options:
- Amazon partnered carrier: Amazon offers heavily discounted shipping rates for UPS.
- Non-Amazon partnered carrier: You can use your own carrier by selecting one of the options from the dropdown.
Once you’re done selecting appropriate options, click “Accept charges and confirm shipping” on the bottom right side.
Step 7: Print Your Labels
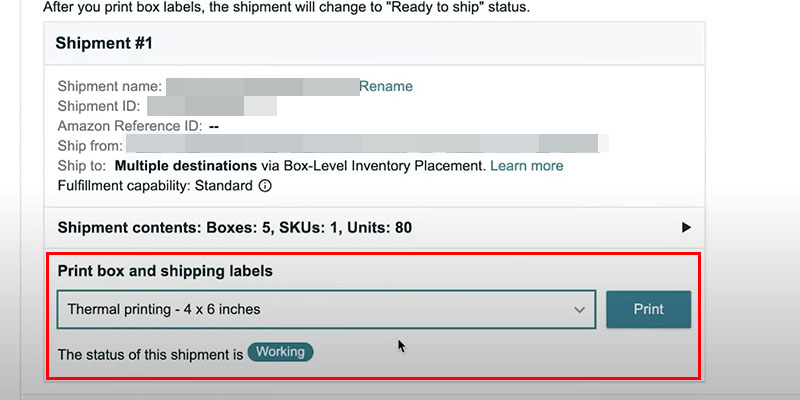
The final step of the process is to print the box labels and ensure they are placed on the correct boxes.
This step also provides information about which warehouse(s) your inventory will be shipped to.
Unfortunately, you can’t select the warehouse where your shipment gets delivered. So if Amazon assigns multiple warehouses, you must ship to all of them.
To track the shipment and view its shipping location, go to “Inventory”> “Manage FBA Shipments” and view the shipment details.
What If Your Shipment Gets Assigned To More Than One FBA Warehouse?
If your shipment gets assigned to multiple FBA warehouses, you must ship to all of them.
The chances of being assigned to multiple warehouses are higher if you have large or oversized inventory. Unfortunately, this can increase shipping costs and the time required to manage your inventory.
Amazon’s Inventory Placement Service allows you to ship all of your inventory to a single fulfillment center at an additional cost.
Amazon’s Inventory Placement Service
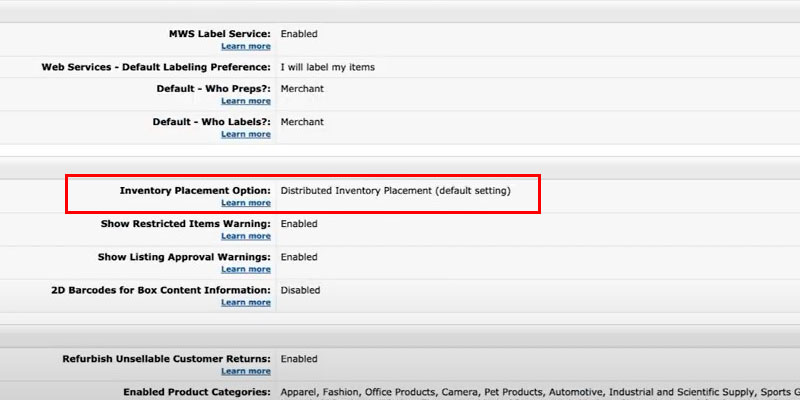
Amazon’s Inventory Placement Service is a distribution service designed to help FBA sellers manage their inventory.
It allows sellers to send their entire inventory to a single Amazon fulfillment center, eliminating the need to send separate shipments to multiple Amazon fulfillment centers in different regions.
Follow these steps to activate Inventory Placement Service:
- Navigate to “Settings” on the top right-hand side of your Amazon Seller Central account.
- Select “Fulfillment by Amazon” from the dropdown menu.
- Go to the “Inbound Settings” section and change the “Inventory Placement Option” from “Distributed Inventory Placement” to “Inventory Placement Service.” You can do it by clicking on the “Edit” button of “Inbound Settings.”
- Click “Update” to save the changes.
- Go to “Manage Inventory” and create a new shipping plan.
Remember to change back to the default “Distributed Inventory Placement” setting once you’ve created a new shipment plan using the Inventory Placement Service.
Otherwise, every shipment you set up after that will automatically use the Inventory Placement Service without notifying you. This could result in unexpected fees since the Inventory Placement Service isn’t free.
Inventory Placement Service Fees
Inventory Placement Service fees start at $0.30 per pound and go up to $1.30 for items above five pounds. These fees are based on the weight and quantity of the items being shipped.
Here’s how Amazon calculates your Inventory Placement Service fees:
| SIZE | WEIGHT | FEES |
| Standard | 1 lb or less | $0.30 |
| Standard | 1 to 2 lb | $0.40 |
| Standard | Above 2 lb | $0.40 + $0.10 per lb above the first 2 lb |
| Oversize | 5 lb or less | $1.30 |
| Oversize | Above 5 lb | $1.30 + $0.20 per lb above the first 5 lb |
The calculation of the Inventory Placement Service fees can be found in the “Review Shipment” section when creating a new shipping plan.
For example, if you have a shipment of 1000 units weighing three pounds each, your Inventory Placement Service fee would be $0.50 per unit or $500.
How To Prepare Your Amazon Shipment

You can prepare your Amazon shipment by navigating to the shipping queue, where you’ll find all your shipment plans.
Remember, once you create a shipment plan, you can only modify the shipment date, shipment name, and number of units. If you want to edit any other details, you may need to delete the plan and create a new one.
Follow these steps to change the total number of units of your shipping plan:
- Go to the “Inventory” tab and select “Shipments.”
- Find the shipment plan and click the “Work on Shipment” button on its right-hand side.
- Click the “View or edit contents” hyperlink in the “Step 3: Box labels printed” section.
- Add the new quantity in the “Updated quantity” field.
- Click “Validate updates.”
Amazon only lets you modify the quantity by 5% or six units per SKU per shipment, whichever is greater. You’ll receive an error message if the amount entered exceeds the recommended limit.
Should You Choose Small Parcel Delivery (SPD) Or Less Than Truckload (LTL)?
You should choose Small Parcel Delivery for shipments under 30 individual boxes and Less Than Truckload for shipments over 30 boxes that are palletized according to Amazon’s specifications.
Since SPD is simply shipping individual cartons to Amazon, it’s best suited for small businesses that ship small individual parcels to customers.
However, keep in mind that there is a limit of 200 boxes per shipment for SPD.
On the other hand, if you’re shipping over 30 boxes, it’s more cost-effective to use LTL, which is suitable for sellers with more inventory to ship.
The LTL method is only used for cartons weighing 150 lb to 15,000 lb.
Although the transit time is higher for LTL, it’s more cost-effective. It also offers greater security since pallets are more likely to stay secure during transport.
Final Thoughts
Creating a new Amazon FBA shipping plan can be intimidating, especially for first-timers. However, by following the step-by-step process outlined in this guide, you can easily create a shipping plan that meets Amazon’s guidelines and delivers your products to FBA warehouses on time.
Remember to stay organized, double-check your information, and use trusted carriers to minimize anxiety and ensure smooth deliveries.
And if your manufacturer is handling the shipment from Alibaba to Amazon, make sure to communicate clearly with them about the process.
For more information on best practices in importing from China, check out my articles, Importing From China: A Comprehensive Guide For Beginners and Shipping Marks: A Guide To Marking And Labeling Shipments.

Ready To Get Serious About Starting An Online Business?
If you are really considering starting your own online business, then you have to check out my free mini course on How To Create A Niche Online Store In 5 Easy Steps.
In this 6 day mini course, I reveal the steps that my wife and I took to earn 100 thousand dollars in the span of just a year. Best of all, it's free and you'll receive weekly ecommerce tips and strategies!
Related Posts In Getting Started On Amazon
- Shipping Marks: A Guide To Marking And Labeling Shipments
- Is Selling on Amazon Worth It in 2025? The Unfiltered Truth
- How To Sell Used Items On Amazon (A Step By Step Guide)
- How To Contact Amazon Customer Service And Get Help Immediately
- How To Create An Amazon FBA Shipping Plan – The Ultimate Guide

Steve Chou is a highly recognized influencer in the ecommerce space and has taught thousands of students how to effectively sell physical products online over at ProfitableOnlineStore.com.
His blog, MyWifeQuitHerJob.com, has been featured in Forbes, Inc, The New York Times, Entrepreneur and MSNBC.
He's also a contributing author for BigCommerce, Klaviyo, ManyChat, Printful, Privy, CXL, Ecommerce Fuel, GlockApps, Privy, Social Media Examiner, Web Designer Depot, Sumo and other leading business publications.
In addition, he runs a popular ecommerce podcast, My Wife Quit Her Job, which is a top 25 marketing show on all of Apple Podcasts.
To stay up to date with all of the latest ecommerce trends, Steve runs a 7 figure ecommerce store, BumblebeeLinens.com, with his wife and puts on an annual ecommerce conference called The Sellers Summit.
Steve carries both a bachelors and a masters degree in electrical engineering from Stanford University. Despite majoring in electrical engineering, he spent a good portion of his graduate education studying entrepreneurship and the mechanics of running small businesses.